_edited.png)
Step-by-Step Sewing Tutorial: Loose Fit Trousers with 4 Length Options (FREE sewing pattern)
- Jun 11
- 4 min read
This beginner-friendly tutorial will guide you through sewing the free loose fit trousers pattern with short, knee-length, culotte, or floor-length options. The relaxed fit makes it very forgiving and comfortable.
Download the Loose Fit Trousers sewing pattern with this link:


Materials You'll Need
Fabric: 44 inches wide fabric
Short: 2 yards
Knee-length: 2.5 yards
Culotte: 2.5 yards
Floor-length: 3.5 yards
Elastic: 4.5 cm wide (waist measurement minus 5–8 cm)
Thread to match fabric
Optional: interfacing for waistband
Basic tools: scissors/rotary cutter, pins/clips, ruler, safety pin, iron
Recommended fabrics: Linen, cotton, rayon, Tencel, lightweight denim.
Skill level: Beginner
Time: ~5 hours
Step 1: Prepare Your Pattern
Download and print the PDF pattern at Actual size or 100% scale (do not scale to fit).
Cut out all pattern pieces:
Trousers (front and back pattern)
Waistband
Pocket (optional)

Choose your desired length and cut the pattern at the corresponding line:

Shorts: Shortest line
Knee-length: Second line
Culotte: Third line
Floor-length: Longest line
Step 2: Cut Your Fabric
Wash and iron your fabric first (to pre-shrink).
Fold fabric right sides together.
Pin the pattern pieces on the fabric following the grainline arrows.
Cut:
4 trousers legs
2 Waistband
4 Pocket pieces (if making pockets)
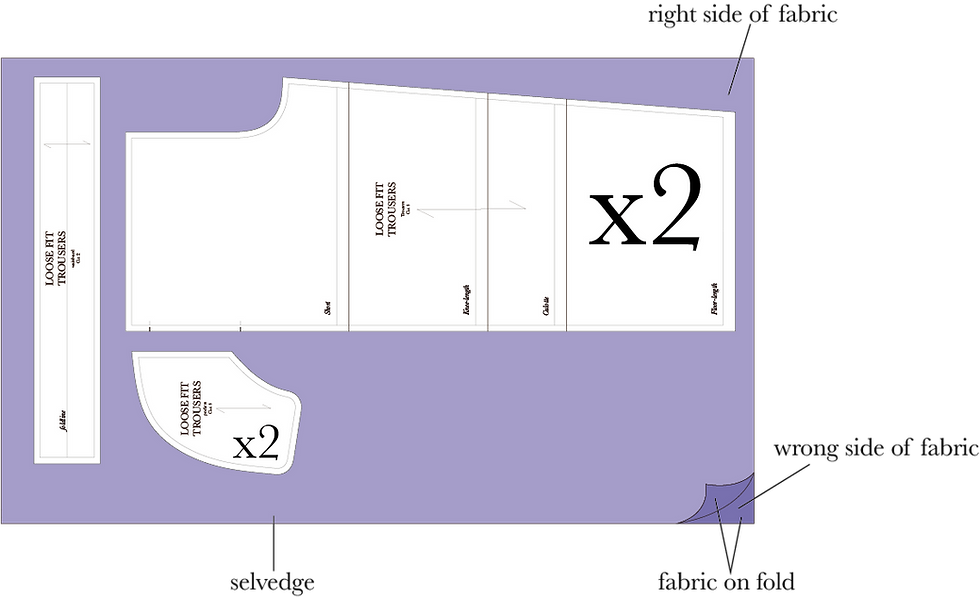
Transfer notches using tailor’s chalk or fabric marker.

Step 3: Sew the Crotch Seam

Place trousers pattern right sides together.
Pin along the crotch curve.
Sew the crotch seam with a 1 cm seam allowance.
Press the seam open or finish with an overlock/serger/zigzag for a clean look.
Repeat for the second leg (you now have two separate leg units).
Step 4: Sew the Inseam

Open both leg units flat.
Place the two leg units right sides together, aligning the inseam together.
Pin along the inseam from hem up to crotch.
Sew with a 1 cm seam allowance.
Press the inseam open or to one side.
Step 5: Sew the Side Seam

Aligning the side seams, matching notches at side seams.
Pin the side seam except the notch part on both sides.
Sew with a 1 cm seam allowance.
Press the side seams open.
At this stage, you should have the basic trousers assembled.
Step 6: Sew the Pocket

Place pocket piece right sides together with the front leg at the marked pocket opening.
Pin the pocket and opened side seam together (Leave 1 cm at both the beginning and the end of the pocket opening).
Sew along the pocket opening with 1 cm seam allowance.

Flip pockets to the side.
Place two trousers pieces with the right sides facing each other.

Pin the curved pocket seam together.
Sew along the curved pocket seam with 1 cm seam allowance.

From the right side, topstitch 2-3mm from the pocket opening edge at back side of the trousers to secure and give a neat finish. Repeat for the other pocket.
At the front side of the pocket, sew a straight stitch 1 cm apart from the edge to secure both the trousers and the pockets.

Sew bartacks (short straight stitches) at the top and bottom of the pocket opening (front side only) for reinforcement.
Step 7: Sew the Waistband

Place the waistband right sides facing each other.
Pin the short ends together.
Sew the short ends of the waistband together with 1cm seam allowance to form a loop.

Measure the elastic around your body (comfortably snug) at the natural waist. Cut the elastic to this length.

Overlap the elastic ends by 2 cm and sew them securely into a loop. This creates the round elastic band.
Place the elastic band on the wrong side of the waistband, then fold the waistband in half with the elastic band wrapped inside.

Pin the waistband to the top edge of the trousers (right sides together), matching side seams.
Sew the waistband to the trousers with 1 cm seam allowance.
Optional: Topstitch at the side seam on waistband for reinforcement.
Step 8: Sew the Hem
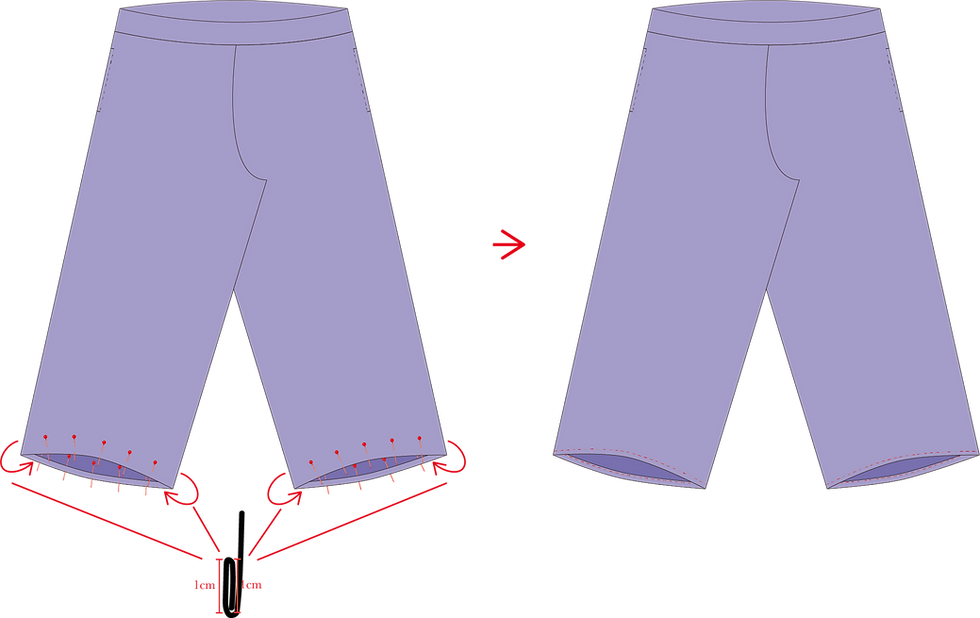
Try on the trousers and check the length. Adjust if necessary.
Fold the hem allowance up by 1cm, then fold 1cm again and pin it in place.
Press the hem firmly.
Topstitch close to the inner folded edge (or use a blind hem stitch for invisible finish).
**For a casual look, you can overlock the raw edge and do a single fold hem.
Step 9: Final Pressing & Finishing
Give the entire garment a good press.
Trim any loose threads.
There you have it! Your loose fit trousers sewing pattern is ready!
A versatile, comfortable, and incredibly wearable free loose fit trousers sewing pattern that gives you four stylish lengths in one download! From breezy summer shorts to elegant floor-length palazzo pants, this pattern lets you create exactly what you need for any season or occasion.
The relaxed silhouette is flattering, beginner-friendly, and perfect for everyday wear. With just a few yards of fabric and some basic sewing skills, you’ll have a new wardrobe staple in no time.
So what are you waiting for?
👉 Download your free loose fit trousers pattern now and start sewing your perfect pair today!
I’d love to see what you create! Share photos of your finished shorts, knee-length pants, culottes, or floor-length trousers on Instagram @keeper.stitch or Pinterest and tag us, your makes might inspire the next sewist!
Happy sewing, and enjoy your new trousers!
More free sewing patterns:
Our Best Seller sewing pattern:

Comments